Instructor: Octavio Perez
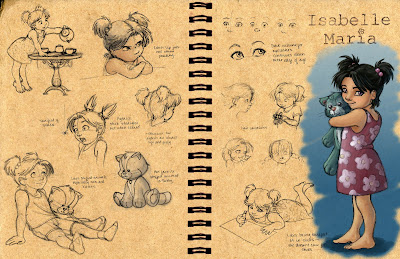
The purpose of this assignment is to introduce you to Photoshop as an image compositing, preparation and painting tool. We are going to cover, file resolution, file formats, color scanning, Photoshop tools, keyboard shortcuts, layering, making selections, color adjustments, etc.
We're going to make this fun...okay maybe not fun but at least tolerable by developing a character in the process. Before you start groaning about character development, keep in mind that the character can be used in any number of illustration genres. You don't have to focus on the entertainment or digital game industry for this project.
Below are some categories that may help you decide on your character.
• Video games
• Movies
• Children's books
• Toys (stuffed animals, action figures, etc.)
• Ornaments, Greeting cards and figurines (Hallmark and Franklin Mint)
• Editorial Illustration (Magazines, Newspapers)
• Advertising (Characters on cereal boxes, etc. )
• Product development (Children's and adult clothing, etc.)
• Cartoons
• Comic books and Graphic novels.
• Book jackets
Your ultimate goal is to create a finished image that combines elements from your sketches with digital paint. Make sure that you pay attention to line and rendering quality. These drawings are going to be part of your final illustration so make sure they are well done. Make notations that will help you complete your final artwork (species, color, detail, direction of light, atmosphere, environment etc.). Your notations may be included as an integral part of your image if you desire.
Directions
• Create an image or series of images that fully explores the possibilities of a character of your own creation.
• The character can be human, animal, alien, mechanical, realistic, stylized or any combination that you desire. Just make sure that it is appropriate for the category that you choose.
• The character must interact with at least three "accessories" (such as an environment, tools, weapons, furniture, transportation other characters, etc.).
• Make sure that the "accessories" are appropriate for the category and character that you choose. Plush toys for toddlers probably shouldn't be packing a 357. What would the chair for a twelve legged character with no butt look like? Try not to think about that last one too hard.
• The character must be of your own creation.
• As you work on your sketches think of how you will combine parts and pieces of your drawings to make one final illustration.
• Use photo reference if necessary. Sometimes looking at a photo of an existing animal or object can help you make your characters more believable.
• Image dimensions are 11"x17"
• The file that you turn in should be a 300 dpi Jpeg no larger than 3 mb.
• Did I say that the character must be of your own creation?
• Use only Photoshop for the completion of this assignment.
Wednesday, February 23, 2011
Wednesday, February 2, 2011
Illustrator Portrait
Course: Computer Illustration IL361 • Instructor: Octavio Perez
Directions:
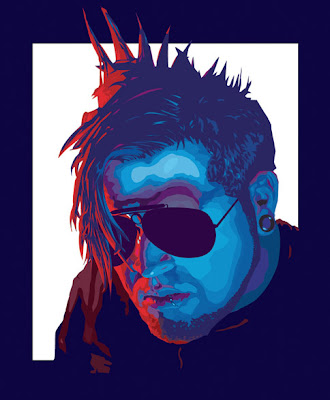
• Find or take your own reference photo of any person. Use a quality image with a well defined light source. Bad snapshots taken with a flash are flat and of little value. Dramatic lighting with a full range of value is what you should look for.
• Do a pencil, pen or charcoal drawing (value study) of the subject. Simplify the values into big shapes. Don't rely on line to define the portrait. Exaggerate the features and make it a caricature if you wish.
• Illustrator only! Don't use Photoshop. No live tracing either!!!!
• Scan your drawing and place it in an Illustrator document (see scanning instructions).
• Use the drawing as a template to assist you in creating a 7"x9" color portrait ( the drawing will not be a part of your final file ). Don't use contour lines on this assignment. Use simple flat shapes and limited line to provide details where necessary.
• Final file format: Illustrator EPS
• Put the final file in the course web share by the deadline.
• SAVE YOUR WORK OFTEN! Crashing computers are no excuse for missing a deadline.
Wednesday, January 20, 2010
Spot Illustrations - Adobe Illustrator
Course: Computer Illustration IL361 • Instructor: Octavio Perez
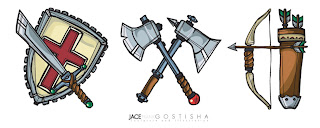
Icons and simple spot illustrations are commonly used in advertisements, websites, magazines, newspapers and various other publications. The idea is to provide the reader or consumer with a general clue of story or product content. They are usually pretty small and simple. A "quick read" is the key to a successful icon.
Directions
• Choose one topic from the short list below.
Sports: Three different sports (not team specific).
Politics: Republican, Democrat, Green Party, patriotic, etc.
Food: Hamburgers, chicken, sushi and salad not specific brands.
Music: Instruments and genres like jazz, rock, etc. (not band specific).
Animals: Lions, tigers and bears....oh my!.....Sorry.
• WARNING!!!!!! DO NOT USE ANY EXISTING LOGOS OR BRAND NAMES IN YOUR ICON SERIES.
• Create an icon/spot illustration series consisting of three small, simple illustrations to go with the topic you selected. All three icons must have similar styling.
• Have completed pencil drawings ready to go by next class. If you have the drawings scanned before class, you will have more time to work on the final artwork.
• Use full color. Remember that the icons or spot illustrations should work together as a series.
• The icons/spot illustrations must be no larger than 3.5 inches in any direction and one of the dimensions must be 3.5 inches.
• All three spot illustrations must be presented on one document.
• Put the final file in the course shared space by the deadline.
• SAVE YOUR WORK OFTEN! I hate for you to start an assignment over again. If you lose your work you WILL have to start again... sorry.
Wednesday, January 13, 2010
Exercise - Tracing in illustrator using the pen tool.
Computer Illustration IL361 • Instructor: Octavio Perez
NOT TRACING!!?
Yes tracing. Would you ever have thought that the worst taboo for an artist would be an assignment in college? Well it is ( I just assign it so I can point and laugh at you), but it's just to get you familiarized with the basic tools in illustrator I wouldn't want you to exhaust your own creativity on the first assignment so I've provided one for you.
Now before you start whining about this, everybody has to do it and you will get an "A" if you just follow the directions. Think of it as an exercise not an illustration.
Directions
• Open the file named Template.jpg in Illustrator. You can find the file in the course webshare.
• Take a good look at the image, it's not just lines and it''s not just shapes...it's both. Once you can tell the difference, dive in and start tracing with the pen tool. DO NOT USE THE PENCIL OR PAINTBRUSH TOOLS.
• You don't have to make an exact duplicate of the image.
• Create the image in full color. You don't have to get all fancy with highlights and shadows. If you want to show off in front of the class I'm not going to stop you from being a "suck-up".........I mean making a masterpiece.
• You can use as many layers as needed to keep the image organized. Just don't drop sixty layers on it. Show some self control.
• The whole premise of the pen tool is to make a shape or line with as few points as possible. You'll get more comfortable with it the more you use it... so have patience.
• SAVE YOUR WORK OFTEN! I would hate for you to have to start any assignment over again but if you lose your work you WILL have to start again... sorry.
Subscribe to:
Comments (Atom)


